How to create interactive seating charts for concert halls, night clubs and restaurants for online tickets selling
Any modern ticket selling system must provide its clients with the opportunity to use the schemes of concert halls. The ticket tool enables to arrange tickets selling for both the event without the hall scheme and the event where you cannot do without the hall scheme. Moreover, there is an option of combination, i.e. using the scheme and selling some tickets without indicating seats. Such an option is often used in night clubs for selling tickets at the tables and on the dance floor.
What types of events interactive seating charts should be used for
Our experience shows that using concert hall schemes is totally excluded only for those events where seating of spectators is not provided at all, it can be discos or music festivals that are held not in the concert hall, but for example in the open air. The applying of hall schemes is justified almost in all other cases starting with small concerts in the restaurant to huge sports arenas.
The use of the concert hall scheme allows the client to select the best available seats at the moment in accordance with his or her budget. It is not only convenient but enables the buyer to guess the event scale. There are pluses also for the organizer. Due to the seating chart, he avoids extra turning to support service to choose the best seats and explain orally or in writing where the spectator will take place or if there are any other options.
There are some countries with definite cultural peculiarities and traditions in the entertainment industry to sell concert tickets at the same price category. In this case, the hall scheme is not quite necessary because a spectator can choose any vacant seat. Although in such situation organizers use this layout for selling tickets. It can be explained by the fact that the hall scheme enables to regulate the process of placing the audience and start the concert in time, as the spectators know what seats they should take and do not move randomly around the hall in search of the best ones.
How to order the a seating chart
We should remind that our tickets selling service provides clients with the opportunity to make free order for the hall layout to sell tickets in the future. Before turning to the support service we would like to recommend you to make sure that the necessary tickets selling scheme had not been developed by us before. We have a general database of halls schemes where there are already more than six hundred schemes of different types of venues for holding events in various countries. If there is no such scheme in our database, you should turn to the support service and give the hall layout draft or the link for it. According to our experience, before providing this draft you should be convinced that this layout is urgent as concert venues may have several halls. The other reason for it is that venue owners can change the configuration by replacing seats or closing some hall part if the event scales are not supposed to use all available seats. That’s why you shouldn’t give the first layout draft found via the search engines hall to our support service. First, call or write to the owner of the concert venue and make sure the draft corresponds to the real placement of seats in the hall that you are going to order from our support service. It will assist us to save the time and help you to sell tickets faster not waiting for making any changes or reordering the venue layout.
How long it will take to develop the hall layout
As a rule, it doesn’t take much time to develop the hall layout. The average hall containing 500-600 seats with a standard placement is developed within one, maximum of two, working days from the date of applying to our support service. If we speak about a large hall or a stadium, it will take about one working week. It should be noted that the most inconvenient halls for developing are those with round seat placement, for example, circus and amphitheaters. It may take extra time to develop such halls.
How to make hall layout on your own
Having a great experience in working with concert halls layout we have developed our own editor of the hall layout. Any our client can develop a scheme of the concert hall, night club or restaurant independently, without applying to our specialists. Our editor is user-friendly and enables us to get ready-made layout within half an hour; as for the very simple ones, it will take two times faster.
What to start the development of hall layout with
First of all, you should make sure the scheme you are going to develop is urgent. We would like to stress that not all layouts presented on the internet correspond to the current seat placement in the hall.
If you are confident your layout is correct, you can register in our tickets selling system unless you had done it before. Then go to the section “Halls” where there is a list of venues you have already used. You can also add a new hall pressing the link “Add hall” which is above the list. The form of adding the hall looks as follows:
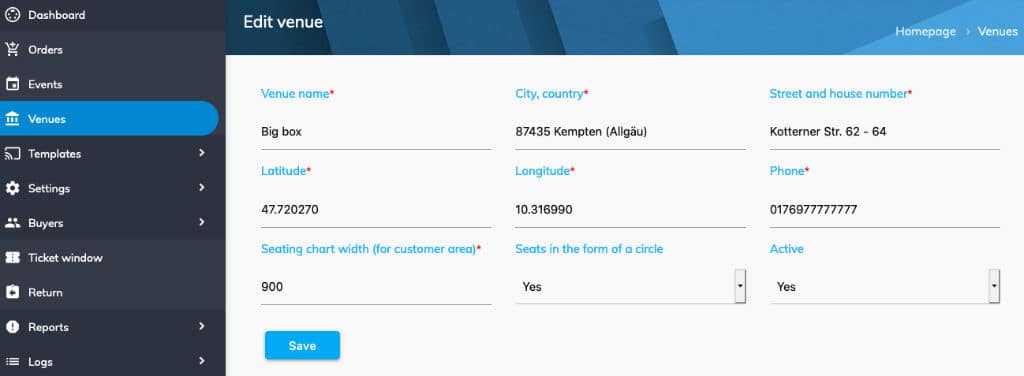
We are quite frequently asked why it is necessary to indicate geographical location here and where you can get it. The answer is rather simple. The location is necessary to show the exact place of the venue on the map, the link of which is on the page of the ticket selling system. It is very useful for a ticket buyer when entering data in a car navigator or smartphone to get the rout. You can find out the location on one of the special services that allow entering the address of any place and get the latitude and longitude. Here is the link to one of such services https://www.latlong.net/.
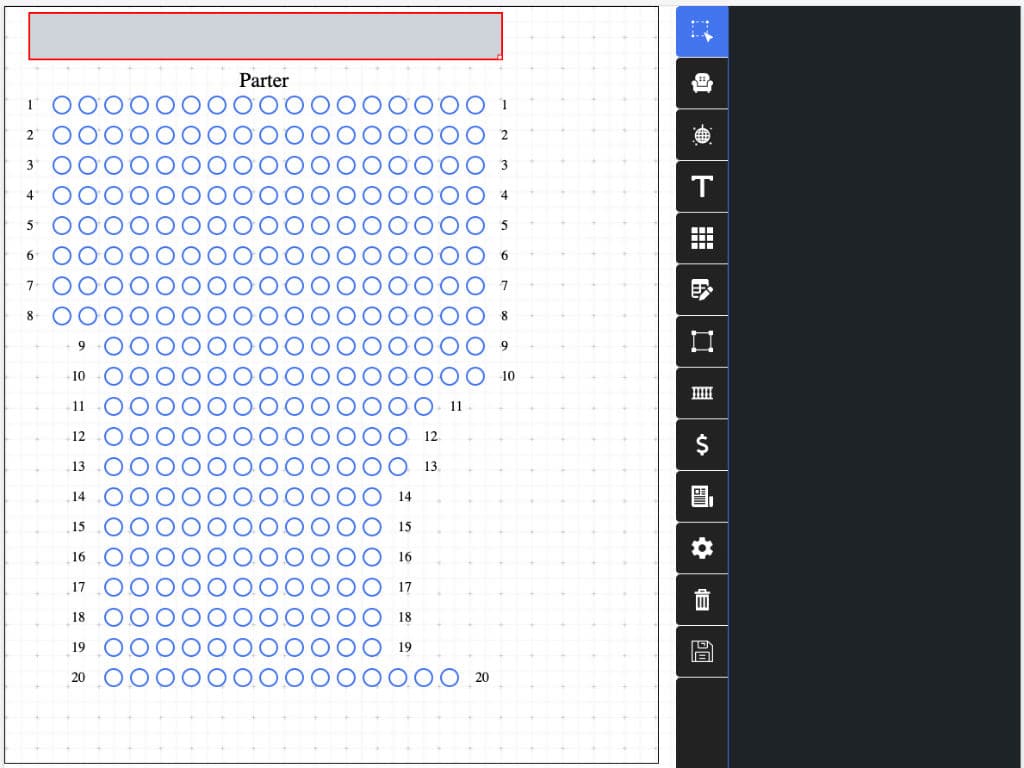
After filling in the above form you should save data and press the button with horizontal lines. It is underlined with a red line on the next screenshot.
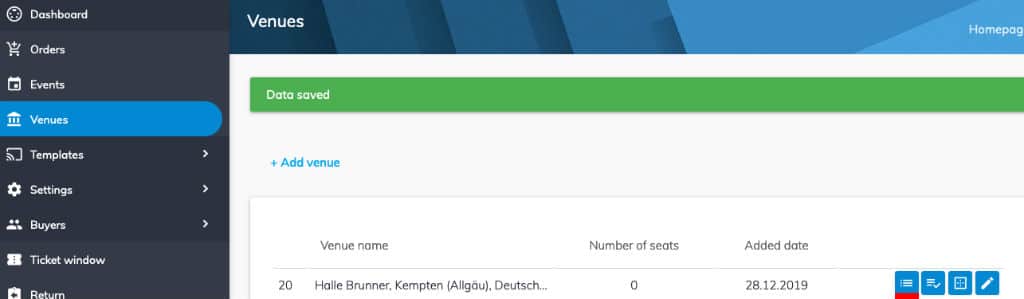
After this, the hall layout editor is opened and the very interesting will start, namely, the development of a new concert hall layout.
We will tell you about the process of hall layout development on the real example. It will be the “Robert Krieps Hall” located at the address 28, rue Münster L-2160 Luxembourg. The query for developing this hall layout was received from the client on the day of writing this article. The client provided the draft of the hall shown below.
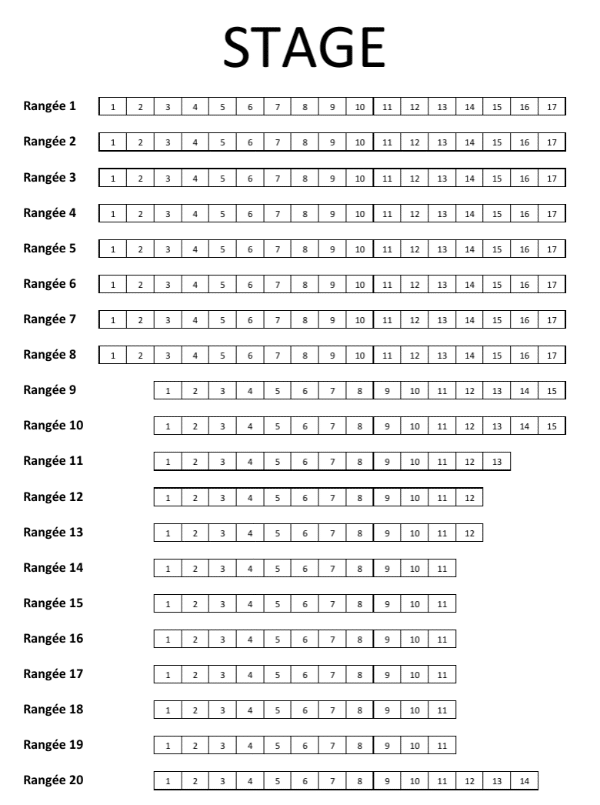
The hall is not very large, it contains only 20 rows and their horizontal placement. From the development point of view, it is very simple; we even have to make the task harder in order to discover all the possibilities of our concert hall editor.
Getting started with the seating charts editor
Hall Editor Window looks as it is shown in the screenshot below:
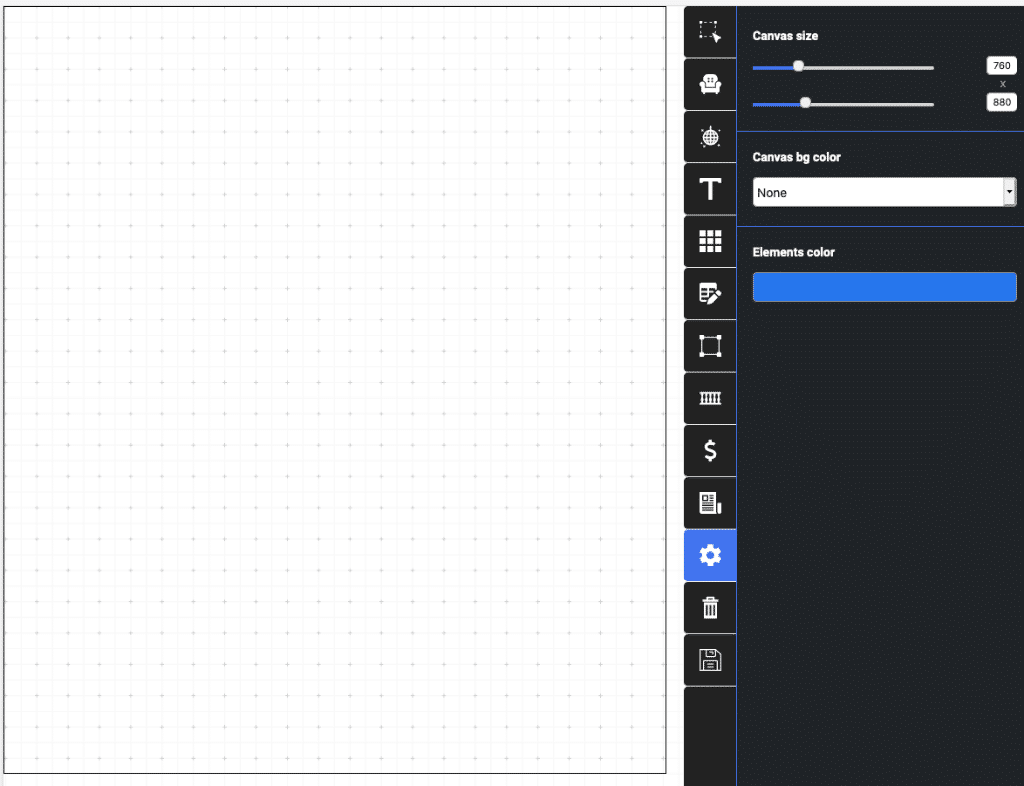
As you can see, there is a workplace on the left, and on the right, there is a tabbed area for process control. We will study each of the tabs as they are used in the developing process of the hall. Let’s start with the settings tab for the size of the layout, this tab is shown in the screenshot above. As you can see, the size of the layout was set to 780 pixels in width and 880 in height. This roughly corresponds to the size of the layout draft. Also on this tab, you can set the background color of the workspace, this option is provided in case the icons are to be placed on the workspace of the same color as the background so they merge with it. In this case, you can change the background during development. The last panel on the active control tab allows you to specify the color of the elements placed on the scheme, in particular the icons, as well as the color of the rectangles or circles, which can indicate the stage or tables on the layout when making the restaurant scheme. After setting the size of the layout, we will proceed to the placement of seats.
The placement of seats on the hall layout
For placing the seats, you should open the second tab above with the icon as an armchair. There is a control panel of seats placing in the screenshot below. As an example, we added extra seats with four available ways.
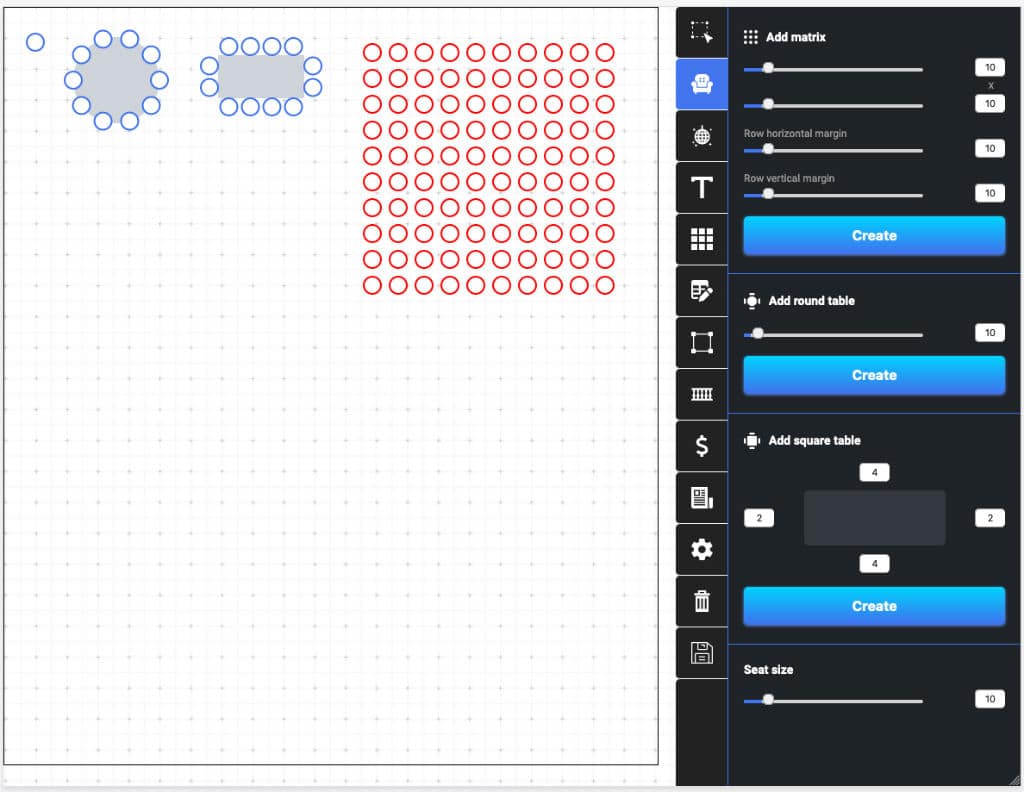
First of all, let’s look at the panel. At the very bottom, there is seat size control. By default, the radius of the circle that represents a seat in the concert hall is set to 10 pixels, respectively, the diameter of this seat will be 20 pixels. We strongly recommend not to change this value, as according to our experience this is the ideal seat size which we always use. As it is mentioned above, there are four ways of seat placing, namely:
- Placing one seat. You should just press the workplace when you are on the tab of adding seats.
- Placing a round table. Its number of seats can be indicated on the control panel. The circle of a necessary size that is in between the seats will be added automatically.
- Placing a square table. The number of seats at each side of the table can be indicated using the corresponding panel. The rectangle which is in between the seats will be added automatically.
- Placing a group of seats. It can be done with the help of the top area on the control panel.
All four ways of adding seats to the layout are shown in the screenshot from the top left to right. Seats or other elements highlighted in red are active and can be moved along the layout with the mouse or keyboard using the arrow keys. When using the keyboard, the shift occurs by one pixel in the right direction, and when holding the Shift key the move happens immediately by 10 pixels.
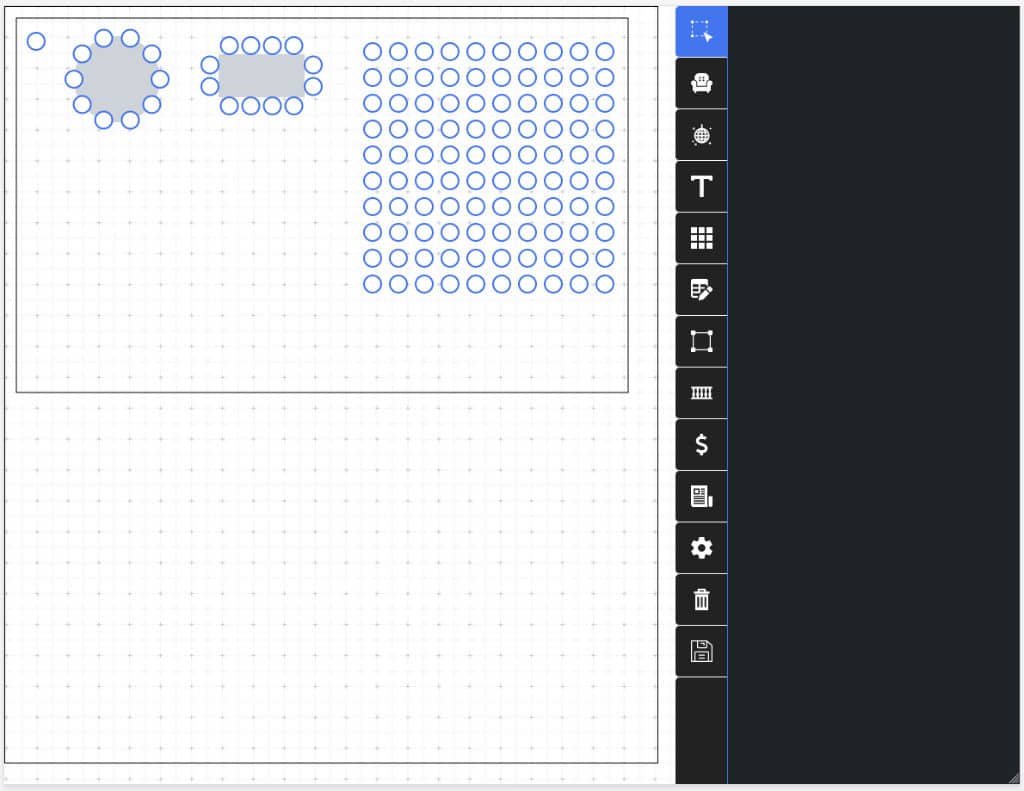
The highlight of layout elements
While activating the very top tab, the hall layout editor comes to the select mode. When this mode is active, you can highlight several elements on the layout using the mouse, move them or remove them at all. As it is shown in the screenshot below, when you click on the working place of the layout and move the cursor, a rectangle next to the mouse appears on the screen, when you release the mouse button, all elements that appear under the rectangle will become active, and the rectangle will disappear. The highlighting tool works just like in any image editor. After activating all the elements under the rectangle, we will remove them.
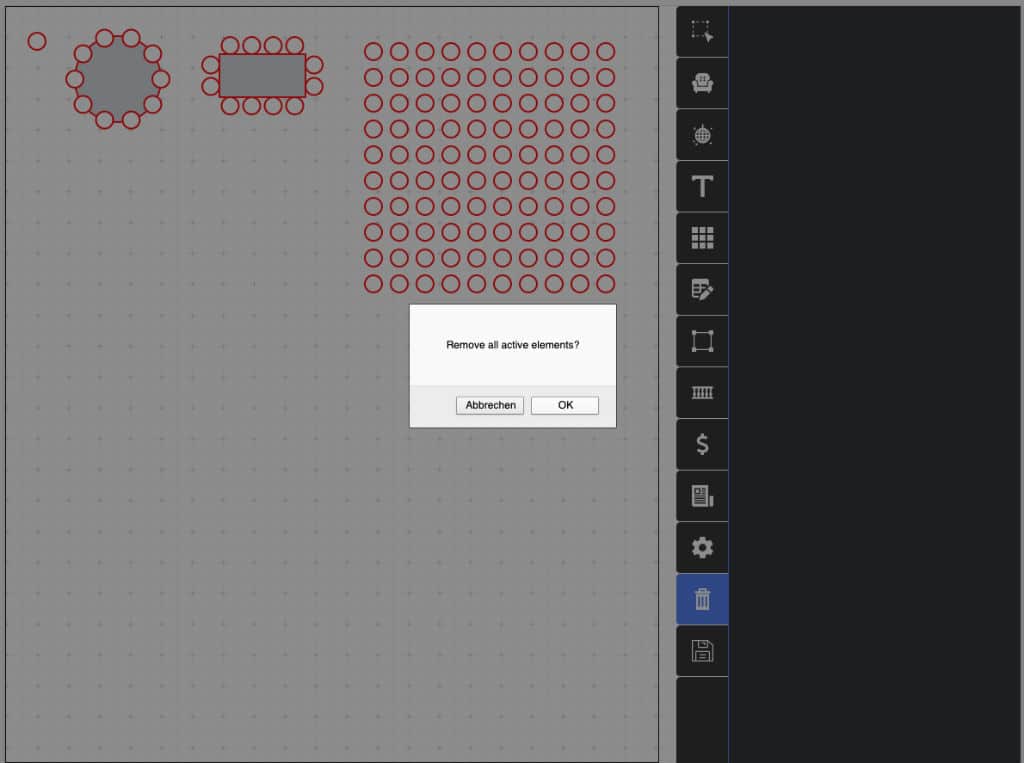
Removing the seats and other elements
To remove elements, you should highlight the first, i.e. to make them in red color. You can do it with the highlighting tool or just press the necessary element. To highlight several elements, you should hold on the key “Shift”. After marking the elements that must be removed, you should click on the button with the icon of the garbage bin; it is located at the bottom of the panel next to the button of the saving hall layout. After confirming the delete operation, all active items will be deleted.
After we have deleted all the seats and tables that we placed for the demonstration, let’s come back to the hall development.
To begin with, we will place on the layout 20 rows of 17 places in each. As can be seen in the layout of our ticket system provided by the client, the number of seats in each row starting from the 9th row will be less than 17, but we will select and delete them later. It’s easier to do in such a way than to place initially the right number of seats in each row. Prepare unnecessary seats for deletion by highlighting them.
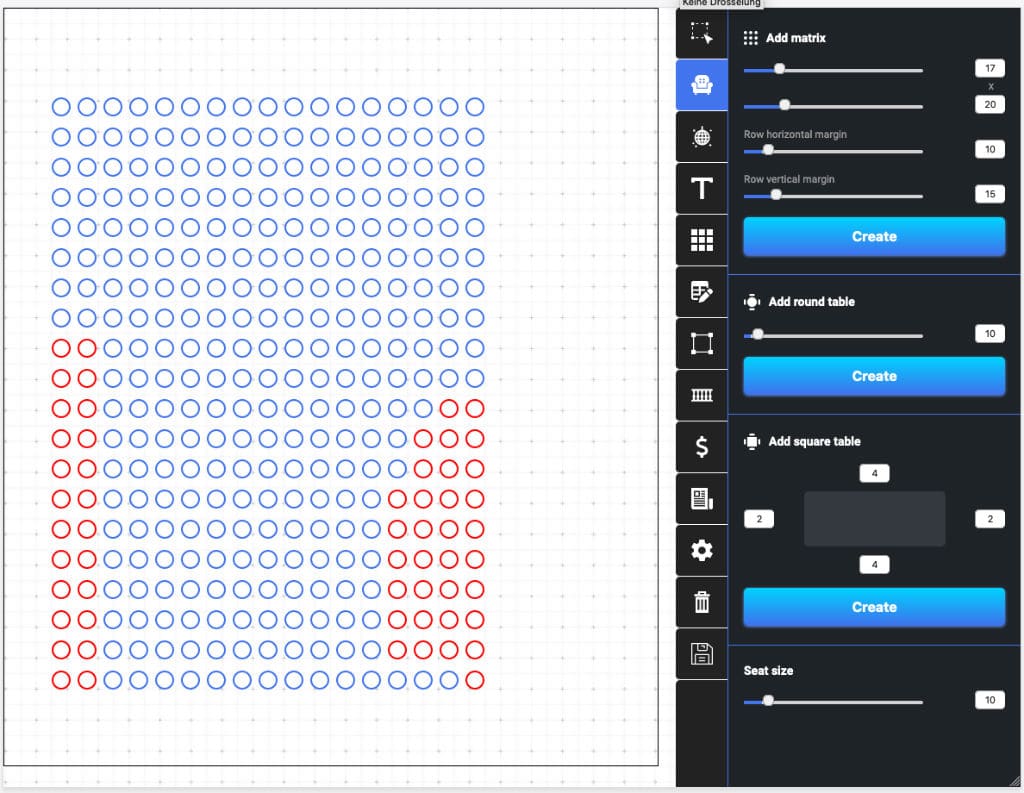
After pressing the delete button, red seats will disappear and we will have the necessary number of seats.
Numbering the rows and seats in the hall
The first step after placing the seats should be numbering the rows. To do this, go to the fifth tab from the top and proceed with numbering the rows. There is one text field on the tab, the value in this field is assigned to the rows when you click on a seat. But this is not the only way of numbering, you can also do this by adjusting the numbering when the coordinates are horizontal or vertical. Roughly speaking, we click on the first seat in the row, and the system assigns a number immediately to the entire row. Thus, the numbering of 20 rows is done in exactly 20 clicks. The value in the field with the row number also does not need to be changed manually, because it is configured to automatically increment the value by one. This means that after clicking on a place from row 1 the value in the field changes to 2 and so on. By the way, the system can work not only with figures but also with letters. If the numbers of the rows went alphabetically starting with the letter A, we would just complete the work in 20 clicks. After numbering all the rows, our scheme looks like shown in the picture below.
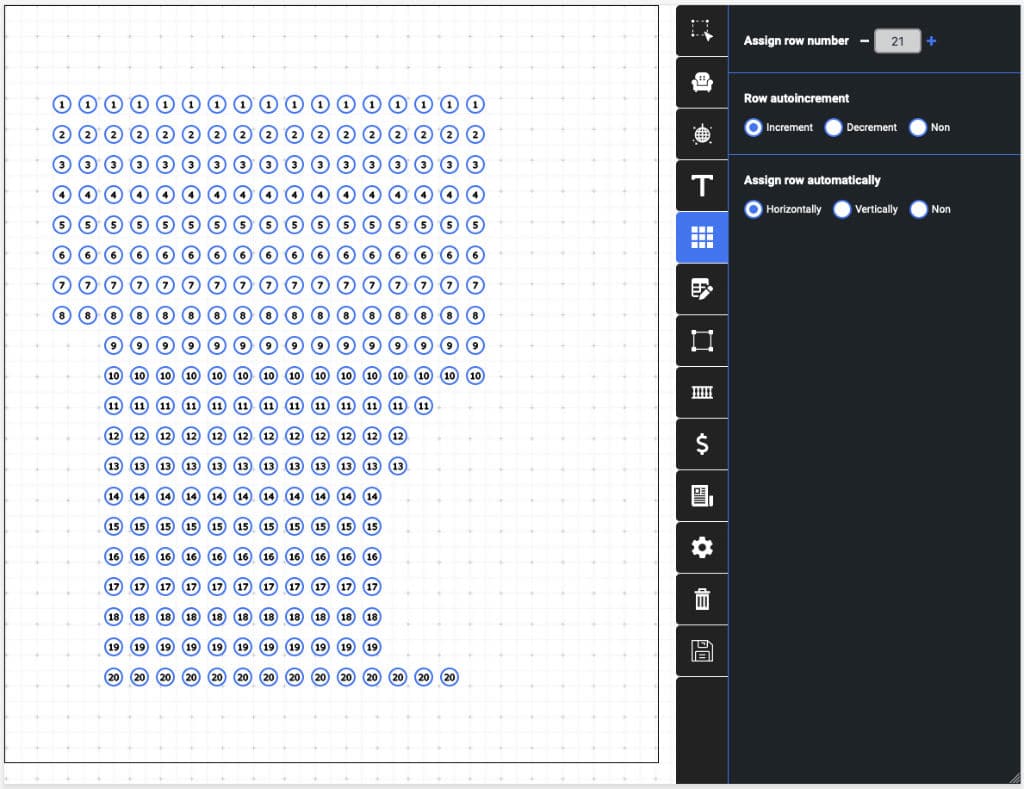
Each seat has the row number which it belongs to.
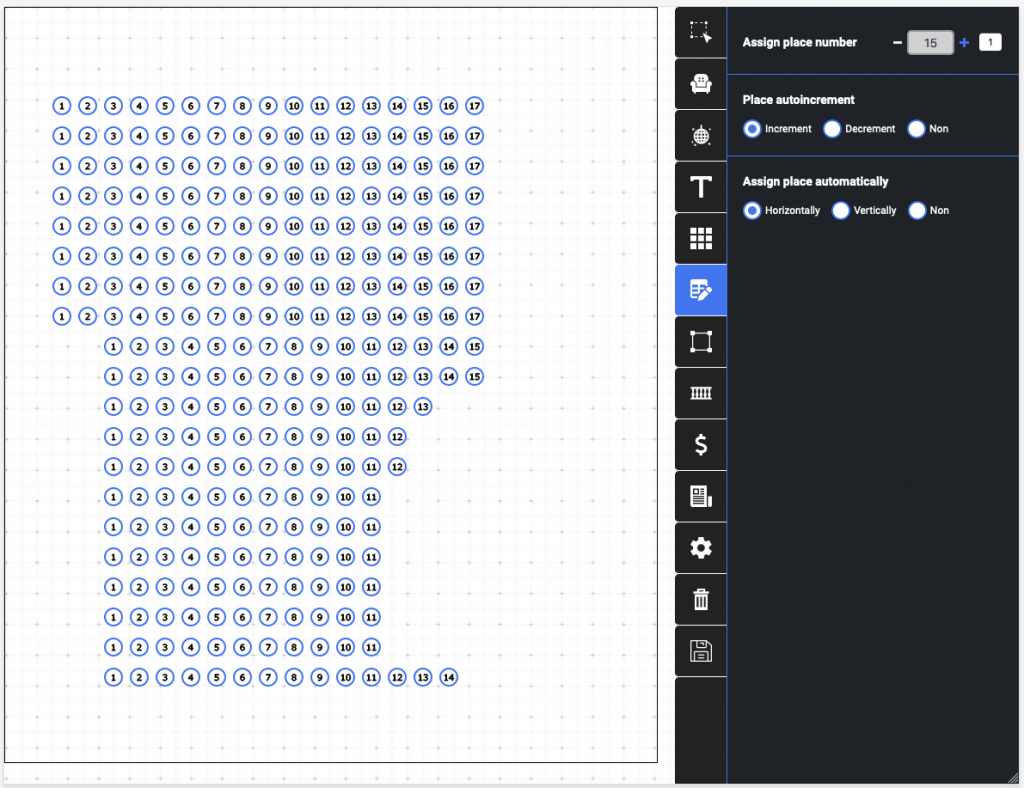
After the numbering is completed, one should proceed to the assignment of numbers to the seats. To do this, go to the sixth tab from the top, the row numbers will no longer be displayed on the layout since the sixth tab displays the number of seats. Fortunately, to indicate the number of places we also do not have to make several hundred clicks, as we have already assigned numbers to the rows we can number the seats automatically in whole rows. Because of this, it is very important to follow this sequence of actions, first number the rows, and then the seats. The numbering of the rows was also completed in 20 clicks since our hall layout editor can automatically arrange seat numbers from left to right, increasing the value in the field by one or choosing the next letter in the alphabet. This is what we get after numbering the seats.
Assignment of zones in the concert hall
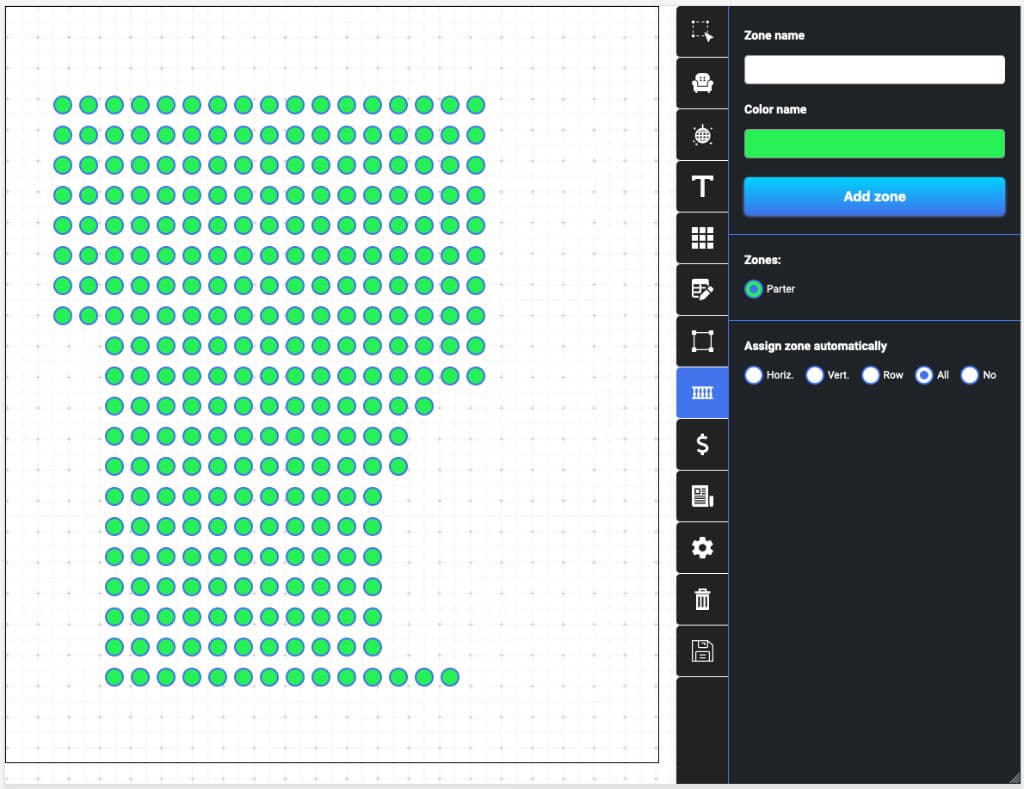
After the assignment of rows and seats, we can indicate to what zones seats belong to. It should be noted that by zone we understand the seats in the hall, grouped by their location. In small halls, there is usually only “Parterre” and “Balcony”. In large halls, there can be several balconies and a lot of boxes. In the given case there is only one zone and we call it “Parter” and assign all seats to it. To do this, go to the eighth tab from the top, with an icon in the form of a fence. On this tab, it is possible to add zones, while assigning colors to them. Colors are necessary to visually distinguish zones in the layout. After creating the “Parter” zone and assigning it a green color, select the “All” option in the seat assignment control panel, which will assign the zone to all seats at once. From the names of other options, it’s clear that we can assign zones to the entire row or separate seats by clicking. It is possible only in case if they have the same coordinates as the seat we click horizontally or vertically.
Assigning the price to the seats on the hall scheme
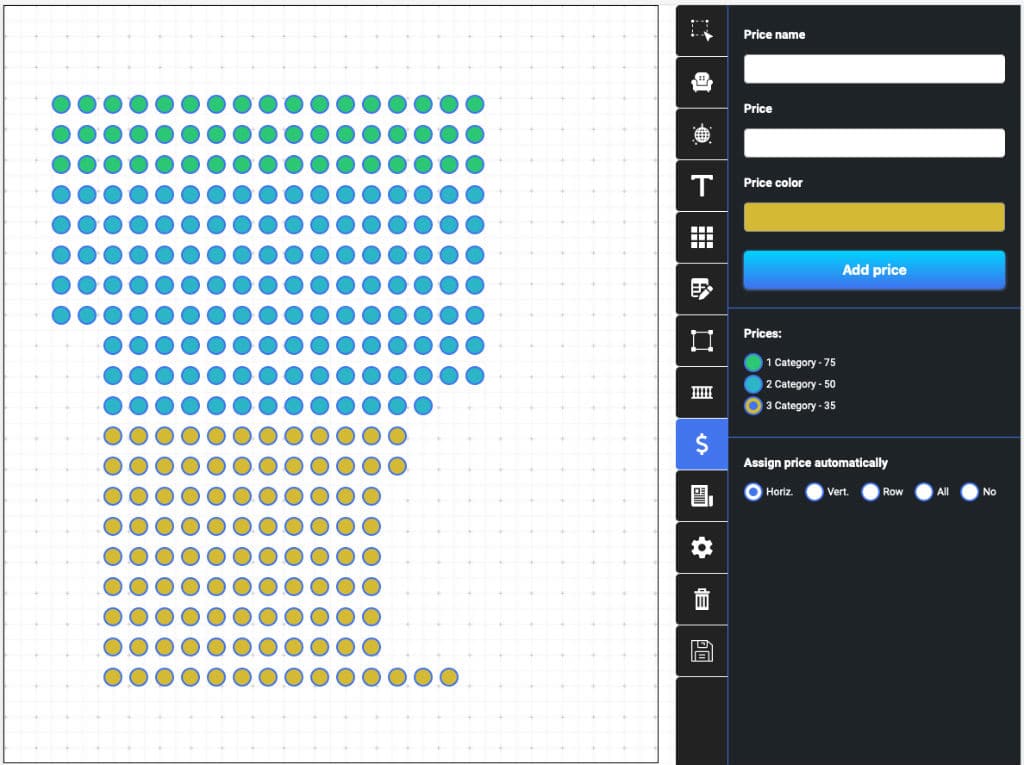
To assign the price, you should go to the tab with a dollar sign. Setting the price is similar to setting zones. We add the name, set the price and color that will correspond to the price category. As an example, we add three price zones and set the prices according to the row.
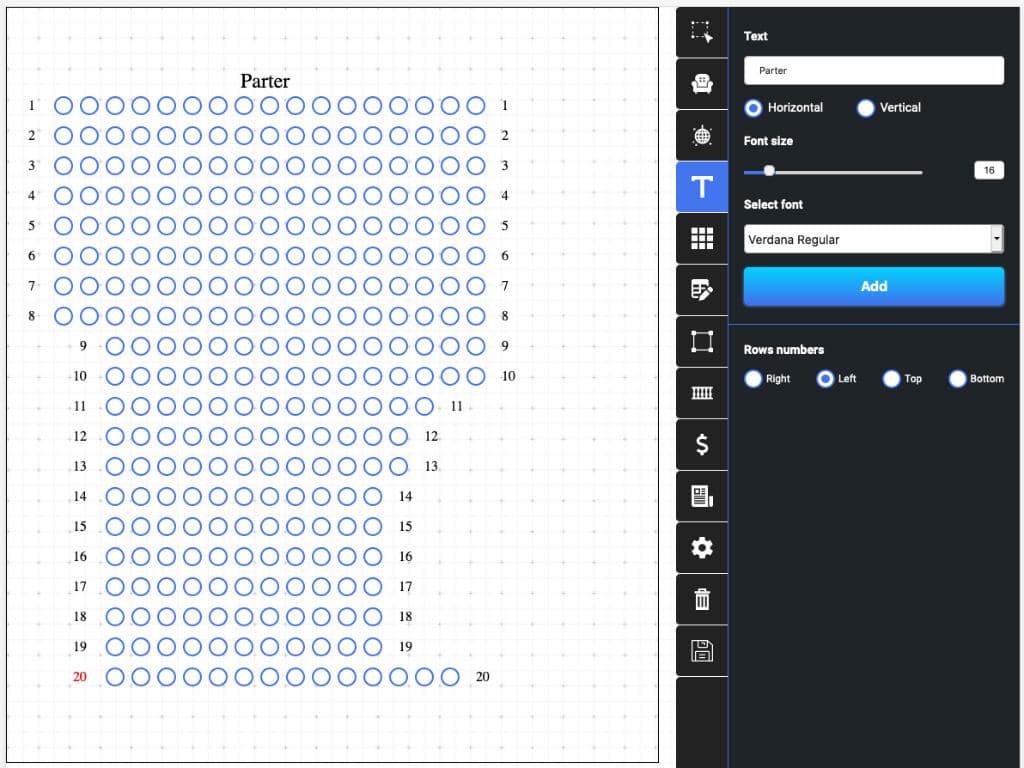
Adding the text to the layout
On every scheme you should enumerate the rows in order the ticket buyers can better focus on the layout, and later in the hall itself. Also, it would be better to show the zones in which the seats belong to. For this, our editor has all the necessary tools. The tab for working with texts is the fourth on top and has an icon with the letter “T”. By going to this tab we see that we have the opportunity to choose the size and font of the text. You should only enter the text and click on the only button on the tab so that the text appears on the working panel. For example, we placed the word “Parter” above the first row. After this, we can place the rows numbers on the layout. It is not necessary to add the text and move it manually, everything is much easier. The numbers of rows can be added by clicking on the seat. For example, clicking on the first seat on the left in any row, there will appear the sign with this row number. At the very bottom of the control panel, you can choose the place this text should appear. It can be either on the left, right, bottom or top of the seat we click on. In this case, the numbering of seats in a row takes us 40 clicks (because there are 20 rows in the diagram). The numbering will appear in the first and last seat of each row, on the right or left of these seats. The result of the work on adding texts to the layout of our concert hall is shown below.
Adding the stage to the concert hall layout
In order to show where the stage is you should go on the seventh tab from the top on which the icon with a square is presented. Here you can give the rectangle dimensions and its coordinates that will be added to the layout. The size of this rectangle can be changed by dragging the lower right corner. To change the coordinates you can either use the keyboard or move the rectangle with the mouse. We place such a rectangle across the width of the entire first row. We will remind you that the color of this rectangle is set on the general settings tab, which was described at the beginning of this article. Also, it should be mentioned that the added rectangle can serve us as a button for choosing seats in a certain price category. For example, to set the price on a dance floor it is necessary to go to the tab, indicate the price category and click on this rectangle to set the price.
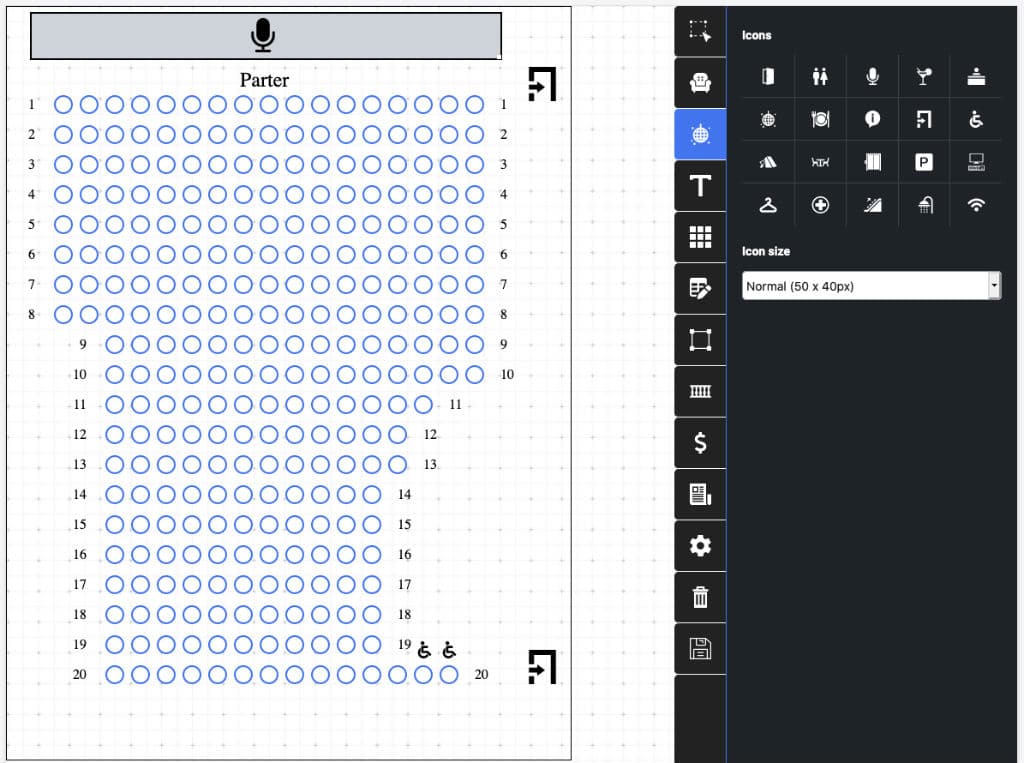
Adding the icons to the hall layout
The last step in developing the hall layout is adding the icons. To do this, we will go to the third tab at the top and among many useful icons including the icon indicating the exit from the room or the icon showing the WIFI access point, we select the necessary ones. In order to make the layout a little more informative, we will place a microphone icon on the top of the rectangle showing the stage, and also mark the last two seats in the twentieth row as the ones for people in wheelchairs.
Besides, opposite the first and last row, we place the icons indicating the presence of exits. As we indicated above, the color of the icons can be changed. It is also possible to choose one of three icon sizes. In this example the smallest and medium icons are present. We didn’t use the large ones, but they can be useful if you need to show parking spaces or other large elements.
The hall layout that we have developed will look as it is shown in the picture below.
The last thing to do is to reduce the width of the hall, as the original one was a bit large. After that, we can save the layout and proceed to the event creation using the scheme we have just made.
This article appeared to be rather large, but the information presented here is very important. Realizing the importance of this information, we intend to make a video illustrating the process of developing the hall a little bit later.
If you have more question, please call us:
Or drop us an E-mail: