Event ticketing WordPress Plugin(event poster) by TicketTool
Who is the plugin for?
The plugin was created for the TicketTool.net customers who use WordPress for managing their websites.
How does the plugin work?
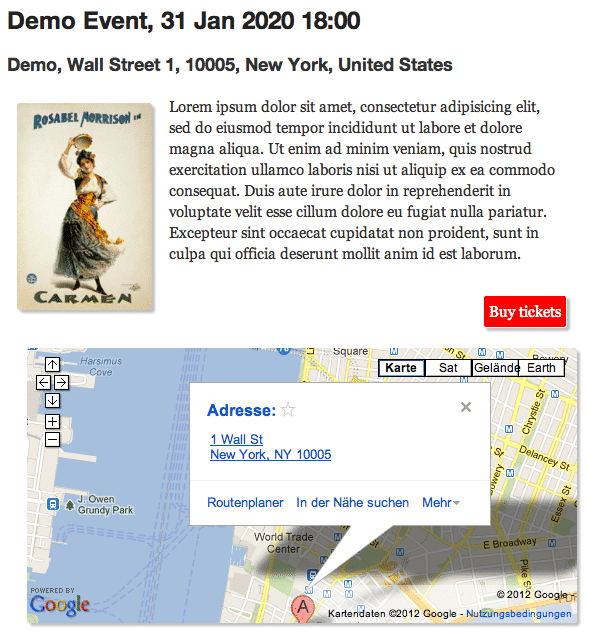
The plugin automatically imports events from the TicketTool.net server and creates pages in a chosen website category according to the plugin’s settings. Its main goal is to remove the necessity of doing the same work twice: creating events in the TicketTool service and on a customer’s website. The plugin automatically imports the event name, the date when it will occur, its description text, and poster image of the event which is set as the image of the corresponding post. Besides, the plugin allows creating the map where the event location is indicated. In case there is enough space on the page, the plugin can place an IFrame there with interactive seats plan and make it possible to choose seats and trade tickets right at this page without having to navigate to TicketTool.net.
Pages which were automatically created by the plugin are managed in the same manner as regular WordPress pages. This allows using the full set of advantages of the WordPress platform.
In case the information about the event was changed at the TicketTool.net you have to import the data once again. The page will change automatically. After changing the plugin’s settings, the events should be imported once again in order to make changes to the corresponding pages according to the new settings.
Where can I download the plugin?
Please use this link, to download the latest version of the plugin. Also you can find it in the WordPress plugin storage.
How to install the plugin?
In order to install the plugin from the WordPress store you should go to the “Plugins” tab and press the “Add Plugin” button. A page opens where you can search for the plugin using the “tickettool” keyword. After that select the plugin named “TicketTool” and click “Install Now”. You have to activate the plugin after the installation is over.
In order to install the plugin from an archive you have to extract the folder containing the plugin and upload it to your server in the following folder: /wp-content/plugins/. After that you just have to activate the plugin.
How to open the plugin page?
In order to open this plugin’s page you have to open the “Settings” menu and click “TicketTool Options”
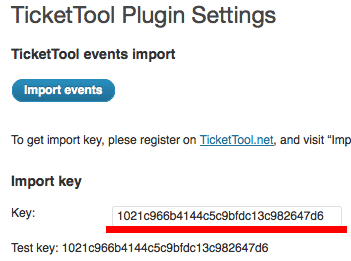
Plugin settings
The main parameter which needs to be set first is import key. In order to get a key you need to log in to TicketTool.net website and visit the “Import” page. In order to check how the plugin works you can use the test key which is shown below the “Key” text field.
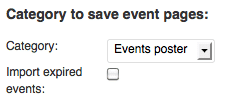
Choosing a category for events import
Events are imported to a certain category of a website. This allows creating events posters. If you don’t choose a category, your events would be saved without a category. A checkbox field which allows you not to import expired events is located below the list of available categories.
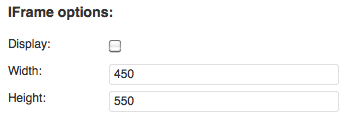
Setting up the interactive seats plan on an event page
In order to put the interactive seats plan to your page you need to set up an IFrame option and specify the dimensions of this map on your page. We advise using this option only in case your page pattern is wide enough. In case the map is too big and requires scroll bars then it would be better to use the “Buy tickets” button which opens the map in a new tab of a browser.
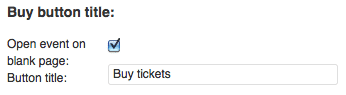
Setting up the “Buy tickets” button
In order to change the text displayed on the button you need to edit a corresponding text field. Besides, you can specify whether the interactive seats plan will open in a new window or not. Please note that this button will be displayed on your page only in case the IFrame option for displaying the interactive map on the page is not set.
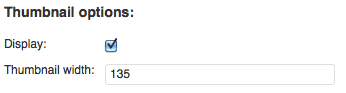
Setting up the event poster on an event page
You can specify how the event poster image will be displayed on your event page with the help of the corresponding option. You can set the width of the image. Its height will be calculated automatically and these proportions will be saved. Please note that this is not the option for this page’s image which will be displayed in the pages list. The image is imported automatically and will be displayed according to your theme settings.
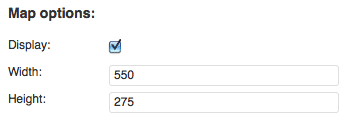
Setting up the map on an event page
The map image on the event page can be set with the help of corresponding option. If the option is set, the map will be displayed under the text describing event. You can also specify the map’s dimensions.
Setting up CSS styles for an event page
In order to make changes to the event page appearance you need to edit /wp-content/plugins/tickettool/style.css file. Here is an example of CSS code:
#tickettool_info img{
 float:left;
 margin: 7px 17px 7px 0;
 -moz-box-shadow: 3px 3px 3px silver;
 -webkit-box-shadow: 3px 3px 3px silver;
 box-shadow: 3px 3px 3px silver;
 border-radius: 3px;
 -moz-border-radius: 3px;
}
#tickettool_info p{
 padding: 10px;
}
#tickettool_button{
 background: red;
 border:1px solid white;
 padding: 5px;
 color:white;
 -moz-box-shadow: 3px 3px 3px silver;
 -webkit-box-shadow: 3px 3px 3px silver;
 box-shadow: 3px 3px 3px silver;
 border-radius: 3px;
 -moz-border-radius: 3px;
 float: right;
}
#tickettool_map{
 margin: 10px;
 -moz-box-shadow: 3px 3px 3px silver;
 -webkit-box-shadow: 3px 3px 3px silver;
 box-shadow: 3px 3px 3px silver;
 border-radius: 3px;
 -moz-border-radius: 3px;
}
As you can see from the selectors' names, the first one is  responsible for the image appearance inside a paragraph of text; the  second one is responsible for the text itself. The third one specifies  how your ‘Buy tickets’ button looks: it is moved to the right part of a  text block and has rounded corners and a shadow. The fourth selector is  needed for changing the appearance of your map.
The result of the plugin with the above CSS styles will have the following look:
If you have more question, please call us:
Or drop us an E-mail: